

On the afternoon of 26 August 1346, Philip Valois found Edward III’s army arrayed on the field east of the village of Crécy-en-Ponthieu, and the result was one of the most critical battles of the Hundred Years’ War. Nearly 662 years later, a group of ten from the United States Military Academy walked the same ground and attempted to make sense of the conflicting reports offered by contemporary and modern historians, alike.
After a brief stop at the observation tower situated on the reputed spot of the windmill from which Edward oversaw his victory, we began our tour in the village of Crécy, at the EMHISARC (EM ulation HIS toire and ARC haeology) museum that commemorates not only this epic battle, but also boasts a collection of articles from the World Wars, including a V1 display. We were met by the organization’s president, and also by Sir Philip Preston, notable historian and local expert. They greeted us warmly and treated us to lunch at the museum before showing us the displays. The museum, though dedicated largely to the Battle of Crécy, includes several activities that allow younger history enthusiasts to experience medieval warfare by practicing their martial skills with practice longbows and swords. Those with more scholarly interests can examine the indoor terrain model of the battlefield. The three-dimensional depiction that takes up several square meters of the room demonstrated the difficulty historians face in identifying the precise array of the English army, in particular. Maps drawn by various historians lie juxtaposed with text from the chroniclers’ accounts, but no definitive arrangement can be agreed upon. With this in mind, we moved to the battlefield itself to try to pair our understanding of the battle with the actual terrain upon which it was fought. Sir Philip led us first to the site of the French approach.
Whether the French army approached the English along one route or several, we do know that they had spent the previous night downriver in Abbeville. The lead cavalry units were the first to reach the battlefield, followed by some Genoese crossbowmen. The king was probably still a good distance from the English when their formation was sighted. The dismounted infantry were surely far behind their compatriots on horseback. Historians generally accept the French line of advance to have been roughly along modern route D 56, indicated by the red arrow on Map One.
Map 1: The French Advance
The French would have advanced from Abbeville generally along modern route D-56 (solid red arrow). As you pointed out, the 16-mile march would have left them wanting for water, which they would seek to replenish in the streams marked by Box 1. Some historians have depicted the French advancing along multiple lines (e.g. red dashed arrow). However, the point is irrelevant to a discussion of the actual attack against the English position, because the terrain, particularly the steep bank in Box 2, would have funneled them back to the west to attack around the left side of the wood, Box 3. The photo that I attached to this email is taken mid-bank, at which point the bank is only 4-5 meters in height. Even there, it was completely impassable for any cavalry formation.
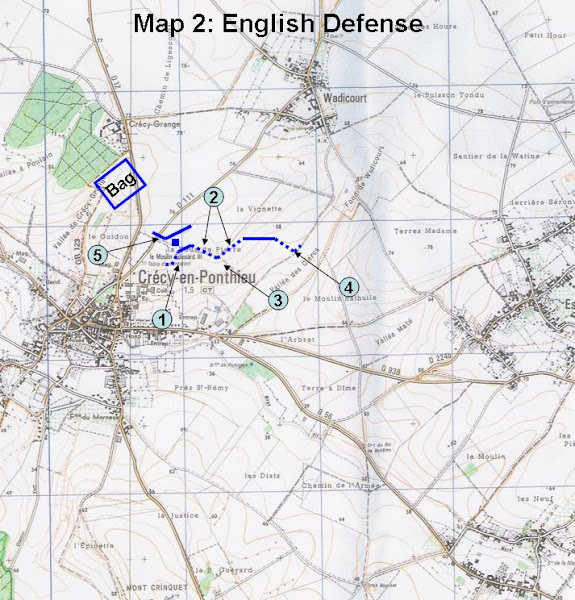
Map 2: The English Defense
This is the more contentious, and therefore more interesting, of the two sketches. Chroniclers' reported that the English formation was arrayed along the hill between Crecy and Wadicourt. Most historians have taken this to mean that the line extended precisely from town to town. Our interpretation still has the defensive line on the hill between the two towns, but we determined that such a thin line would not suit the tactical needs of Edward on this particular terrain. The solid blue bars denote dismounted men-at-arms. The dotted lines represent archers. The solid blue square approximates the location of the windmill from which Edward III directed the battle. We suggested that the archers would have been well-served tying into the terraces (1). They could have prepared to refuse any attempt against their right flank by having an additional line of archers, perhaps of 50m, angled along the edge of the terrace. My sketch has the Black Prince’s 1200 men-at-arms occupying a line approximately 150m in length. This would have allowed for a depth of 8 ranks, which would be appropriate considering for what a great proportion of the fighting his battle was responsible. The next two lines of archers (2) would have been able to take advantage of the sloped terrain (see photo). I have them occupying a total of 700m. If 400 archers were detached to protect the baggage trains (2000 would later be used as a reserve at Verneuil in 1424), the remaining 5600 archers (including Northampton’s 3000) could be evenly distributed into 8 ranks along the entire line. Likely, the stock of arrows would not have been evenly distributed, but supplied in greatest proportion to the most active parts of the line. Similarly, the prince’s 3000 Welsh spearmen could form four ranks along the whole front of the archers (at the bottom of the slope with the archers occupying the vantage position?), perhaps with 200 concentrated at the weakest point in the line (3). The English far left (4) would reflect their efforts to refuse the right flank, and would fire directly into the great bank, which would be well within their bowshot. Any French who attempted to advance through this valley to outflank the English right (as they would have to do if they did not want to circumnavigate all of Wadicourt), would suffer quickly for their underestimation of the power of the English longbow. The king’s reserve of 1600 men-at-arms and 4000 archers, I have placed relatively arbitrarily (5), but it would certainly make sense that they would have three key roles: 1) to prevent the French from outflanking the English far right by circumnavigating Crecy, 2) to protect the king (who was in or near the windmill), and 3) to be prepared to fill gaps in the line. I believe the position accounts for all three of these responsibilities, and, even if it does not have direct support from the chronicles, it certainly does not conflict with any of them so far as I am aware. The baggage train, as PROF Rogers pointed out, was tied to the wood to the north of town. We believed that this reverse-slope position makes sense.
Crécy was an exciting stop for us. Not only did we benefit from having Sir Philip as our personal guide through the museum and battlefield site, but, more than any other stop, we were able to challenge conventional views of how this historic battle was fought.
Our next stop, after a short drive through the countryside, would be the most famous of all Hundred Years’ War battles: Agincourt.
~MAJ Christian Teutsch
Today, 16 June 2008, we visited the site of the battle of Agincourt. This historic battle took place on 25 OCT 1415. While visiting this battle site our primary concern was to determine the original and final positions of the English longbowmen. Placement of the longbowmen in battle was one of the primary concerns for the English army during The Hundred Years War.
The maps at the site of the battle of Agincourt indicate that the original position of the English Longbowmen was at the end of the battle field pressed against the town of Maisoncelles. Judging from the current terrain of the battle field it is hard to believe that the English commander, King Henry V, would have placed the Longbowmen in this particular spot. The longbowmen would have been in the middle of a ditch. The slopes on either side of the ditch would have given the English archers very poor visibility. The English longbowmen would have been sitting unable to defend themselves as the French Cavalry charged them.
Our resident medieval history expert Dr. Rogers had estimated the placement of the English longbowmen on the same side of the field approximately 500 meters north of the spot the maps at the battle site had placed the archers. Dr. Rogers had originally believed this was the spot because he felt the longbowmen would have had the greatest ability to fire, and visibility from this position. Upon viewing the position from the battlefield, he decided against his original placement of the archers. This position was obstructed by an inter-visibility line directly in front of the archers. The entire length of the position would have been too low in the field for the longbowmen to fire accurately.
After an exhausting search of the battlefield were able to decide on a single spot that seemed reasonable for the placement of the English longbowmen. This position was located 500 meters to the north of the position Dr. Rogers had originally estimated for the site of the English longbowmen, or 1000 meters north of the position the maps at the battle site had estimated. We choose this spot because it was wide enough to place the entire line of English longbowmen on it, and it was the tip of a crest in the field. This position would have allowed the longbowmen to see the enemy approaching, and then fire repeating accurate volleys of arrows. In addition the incline to the top of the crest would have made a French cavalry charge increasingly difficult.
During our visit to the Agincourt battle site we also visited the resting ground for the majority of dead Frenchmen. The Chronicles written on the monument pictured above tell the gruesome realities of October 25th 1415. According to the monument the bodies of the deceased French had been stacked higher then a man, and the majority of them had been killed after being trampled or suffocating in the mud. The monument featured a full sized crucifix surrounded in a circle of trees. This would have placed the pile of deceased French 150 meters in front of the line of English longbowmen.
The visit to this historic battlefield was particularly beneficial because of the extensive revisions we were able to make on our original estimation of the placement of the English longbowmen. Had we continued to rely on maps, whether standard or via Google Earth, we would have never been able to realize that placement of the longbowmen at either of the two sites originally estimated would have been highly unlikely. We also would not have been able to discover what we now believe was the position of the longbowmen 150 meters behind the crucifix monument.
Visiting these historic battle sites allowed everyone on the trip to gain a greater appreciation for the dynamic nature of history. After our first day visiting the battle sites we began to realize that terrain can often be the deciding factor in a battle. Our own understanding of the importance of terrain and ground position in a battle was solidified by our search for the position of the English archers as well as the various other positions we searched for during our staff ride.
Paris

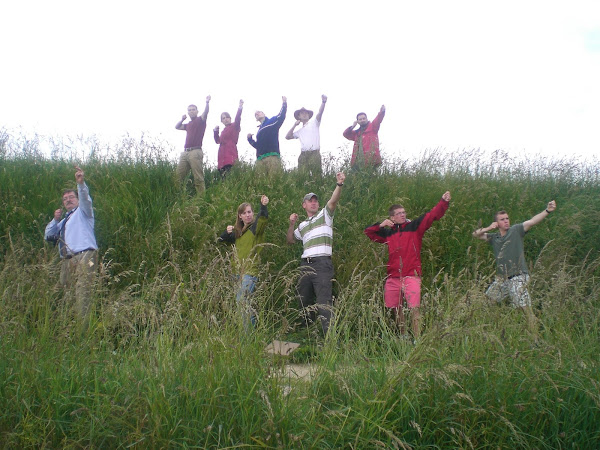
Hotel des Invalides. From the left: Tweeter, Jersey, KAARRLL!, Ty, le #*@%, Doc Rogers, the Duchess, the Sir, Lenny, and Fez
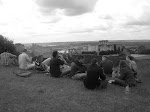
Archers at Crecy
Map 1: French Advance on Crecy

Map 2: English Defense at Crecy
Subscribe to:
Post Comments (Atom)


No comments:
Post a Comment